Showing posts with label preview. Show all posts

Monday, May 18, 2015

New LG G4 Smartphone Review: Raw File Output!

Testing Focus and DOF at About 3-4", HDR
LG G4 unadjusted, cropped, shot in HDR mode
Over the last few days I've had the opportunity to try the new LG G4 smartphone.  I'm going to skip to the end and encourage you to enter to win one, and check the see if the @G4Preview tour currently underway will be near you, so you can try one out as well: http://t.co/rg7c9Am1RP

I've been watching the larger phones to decide when to jump in, and the LG G3 was reviewed as competitive with the top models on the market, especially for camera performance, so I was eager to try this new model out.  Here's the basic overview:

"The LG G4 comes equipped with one of the best cameras on the market not only for any smartphone, but for digital cameras in general." Highlighted features include: 
  • f/1.8 Lowlight Lens, 
  • Manual Mode, 
  • Optical Image Stabilization, 
  • Laser Autofocus, 
  • High-res Image Sensors (16mp rear camera, 8mp front camera for great selfies)
  • Color Spectrum Sensor in addition to many, many more features
It's an attractive phone right out of the box, with its leather case.
Leather case!


The slight curve to its face makes the LG G4 easy to hold
So far so good, but I'm all about the camera.  In particular, the reviews I've seen so far highlighted the image stabilization, and as an avid DSLR shooter, I know the advantages of RAW format.  I've been waiting for years for access to higher quality RAW files from a high resolution smartphone.

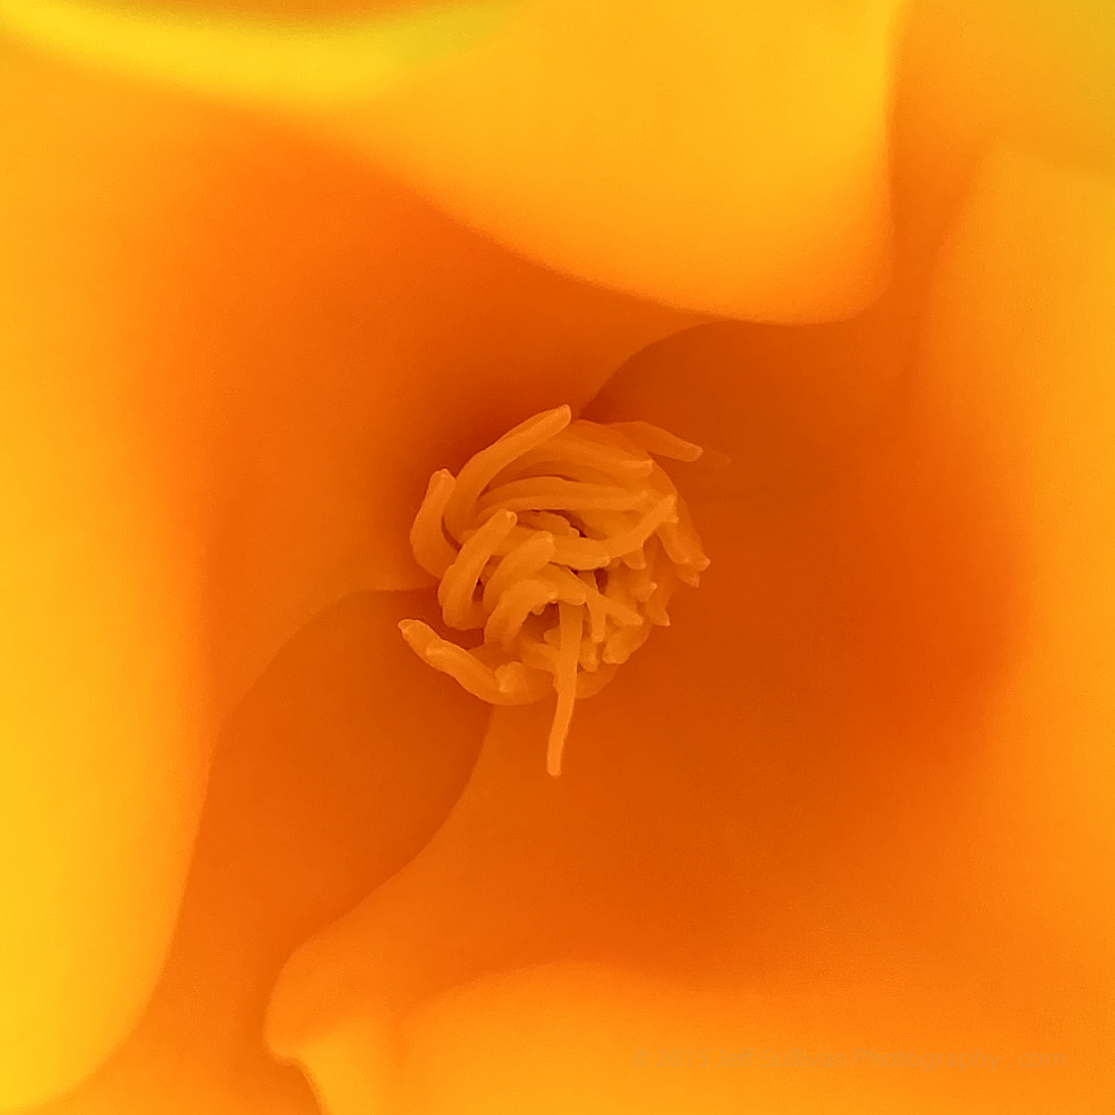
So let's get right to it.  Have you every tried to capture a decent photo of a California poppy?  Most digital cameras do crazy things with the white balance and color, but as you can see at the top above, the Color Spectrum Sensor measured a perfect white balance and created a stunning result right out of camera.  Click on the photo to see the higher resolution original.

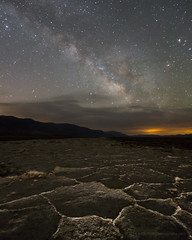
Now let's look at another unedited shot, straight out of camera, captured in low light using the camera's HDR mode. Like every automatically created JPG, the camera made some automatic adjustments, and there is some compression in the output when you view it in detail, as we should expect:

Looks great for most uses, but click on the image to see what auto-created JPG looks like up close.
It's great to have 16 megapixel, 5312 x 2988 results, and no doubt it'll look good on a standard monitor or printed to common prints sizes, but on this phone, can we use another mode to do even better if we really want to dial up the quality?

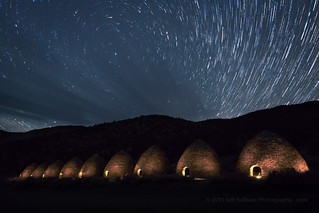
Shot in RAW and adjusted, saved to JPG, yielding MUCH higher quality!  Click on the photo to inspect
When you look at this new image up close, the result speaks for itself.  RAW files to the rescue!  The prior image, automatically adjusted and saved to JPG, looks great and would work fine for most uses, but if you might want to blow the result up into a larger print, the RAW file is clearly the way to go.

I'm still trying out the other features of the phone.  The image stabilization is truly superior.  The panorama mode is solid.  I still need to try out the 4K video on a worthy subject.  We've had some dull, gray, rainy weather over the weekend, but it looks like we may have better light for the next few days, so I can show you what this device can do under a variety of interesting conditions.

Follow my Twitter account @JeffSullPhoto for links to my latest samples, and follow @LGPreview on as well for updates on the LG G4 Preview Tour.

This is a sponsored conversation written by me on behalf of LG. The opinions and text are all mine.

Tuesday, April 14, 2015

First Results With a ProtoMachines LED2 Light

Exploring a small slot canyon on a moonlit night
Last month I bought a high end ProtoMachines LED2 light to use for light painting.  It has presets for tungsten and daylight white balance, so I decided to test its ability to light objects at night with cool, warm and neutral light settings.  I also wanted to get a feel for what intensities worked best.  The LED2 can be used in a brightness range of 9 stops of light.  Each stop represents a 2X intensity change, so its brightest setting should be 512X brighter than its dimmest one.

Illuminated landscape under moonlight
One night offered partial moon illumination of roughly 50%, not terribly different from the conditions we'll be shooting under in our upcoming night photography and light painting workshop in the ghost town of Bodie on May 24.  I illuminated the landscape from about 100 feet away from two positions 50 feet to the right and left of the camera, with the light on intensity levels 4 and 5 (on the scale of 9).  I had checked the daylight and tungsten settings and used RGB values between them to have the light be fairly neutral.  I also used the light to explore a short passage between eroded clay walls (image at top), with the light set to its daylight preset for a warmer effect.

Milky Way Over Badwater Salt Flats
Badwater Salt Flats, Death Valley
I also went out on moonless nights, illuminating the foreground using a neutral white color close to what I expected to be using as a white balance for the rest of the photo.  For the Badwater salt flats I illuminated the foreground from roughly 20 feet to each side.  Due to the darkness of the sky, the sensitivity of my camera settings, and the proximity of the foreground to both the camera and the light, I used intensity levels between 1 and 2.

A point source of light can be though of as sending light in all directions in a sphere.  As you get further away from the source, the sphere is much larger, so the light spreads out over a larger area and gets less bright.  If you consider the geometry and math, you get the Inverse Square Law: the light intensity on the object illuminated is inversely proportional to the square of the distance.


Photographers use the Inverse Square Law when they cut illumination intensity in half by increasing the distance of the light source by 1.4X (the square root of 2).  Similarly you can double the light intensity by reducing the distance to 0.7X.  The ProtoMachines light makes adjustment even easier by adjusting light intensity in stops of light, increments of 2X, so if you want the light twice as bright, you just add 1.0 to the brightness setting. 


Glowing Kilns at Night
Charcoal kilns at night
While shooting these charcoal kilns I used intensities in the 3 to 4 range, but at that higher intensity I only flashed each kiln for a second or two.  I kept the light on the far side of my body so it wouldn't shop up in the image, and I kept walking so I wouldn't show up in silhouette.  For some reason the light takes on a slight pinkish hue here.  I must have messed up when setting the color.  Since I was shooting dozens of shots in a row, I couldn't review the shot while executing the shot, but I can adjust the white balance in Adobe Lightroom after the fact.

A lot of the early adopters of this type of light use it in more of a "crazy colors" mode, painting objects in a variety of shades.  For this foreground texture I decided to use additive light blending, where you add two colors to make a third.  I used blue and red to see if they'd blend to make purple where they overlap. I tried to send the red light in from the left side, and the blue light up the eroded depression from the right side.  For simplicity I shot the red and blue in separate 30-second exposures, and blended the two images in the free StarStaX app.


Light Blending on the Playa
Light Blending on The Racetrack playa in Death Valley National Park
I was able on this trip to use the light on various subjects, in variety of different modes, on subjects near and far, under various types of skies and lighting conditions. I can't wait get back out and use it some more, to practice for our first Bodie night photography workshop of the season coming up on the night of May 24.

To see other lights I've tried and carry, read my prior post:
Gearing up for 2015 With a ProtoMachines LED2 Lighthttp://activesole.blogspot.com/2015/03/protomachines-led2-bgb-light-white-balance.html