Showing posts with label discount. Show all posts

Tuesday, October 11, 2011

HDR Isn't Just a Crutch, or a Crime!

Crescent City Sunset, originally uploaded by Jeffrey Sullivan.
Some photographers have fallen in love with High Dynamic Range (HDR) post-processing, producing dramatic but strange results. Other photographers dismiss the often wacky-looking HDR results as "technicolor vomit" and note that any monkey can move a slider in software to make a scene look strange, the talent lies in making a single, flat camera exposure look more like what we experienced onsite. Unfortunately, the range of light present, the dynamic range of the scene, is often far beyond what a single camera exposure can capture. So like so many polarized debates these days, the prudent path may lie somewhere in between.

Take the example below. Often the most interesting and dramatic lighting can be found shooting straight into the sun, but if you expose to preserve the outline of the sun you'll completely lose shadow detail, and if you expose for the shadows, the sun will be an amorphous white area, a clear failure to accurately capture the scene. There are multiple strategies for capturing a scene like this via bracketed exposures, and multiple options for combining those exposures to recreate the scene, but HDR software such as Photomatix can be a fast and easy option, without requiring a lot of detailed manipulation in Photoshop layers.

Mono Lake afternoon reflection (2009 HDR).
Before you focus on post-processing however, it's important to capture useful exposures which really do improve your dynamic range in the shadows and highlights. Bear in mind that your darkest and lightest exposures are not to capture balanced images across the scene, they are primarily to capture detail in the darkest and lightest areas of the scene. Review your dark, medium and bright exposures. Are you capturing the outline of the sun, detail on the moon, or detail in the clouds, sand, water in the darkest exposure? Are you revealing shadow detail in your lightest exposure? If your exposures are not competently recorded, if you leave the bright areas blown out, some percentage of your audience may dismiss your result no matter what you do in post-processing. HDR is no cure-all, no excuse to ignore the basics of photography.

Once you have three competent exposures to work with, the first option in Photomatix that many of HDR's detractors are completely unaware of (and I think many of its users as well) is the ability to simply average the three exposures together. By averaging three exposures, the darkest exposure adds detail from the bright areas "blown out" to white in your center exposure, the lightest exposure adds detail from the darkest, "blocked out" black areas which your center, best single exposure couldn't handle. This useful functionality has been cleverly hidden in the Batch Processing section of Photomatix, and for years now it's been available for use indefinitely in the free trial that you can download from www.HDRsoft.com. Since your'e simply blending together actual light values captured by your camera, much like the iris of your eye captures different exposures as you look around the same scene, the result is a completely natural-looking result, with more range and detail than any single exposure.

Eastern Sierra morning golden hour light (2009 HDR).
The next level of processing available in Photomatix are the various Tone Mapping, Exposure Fusion and Compressor options. Fortunately in the latest versions of Photomatix you can see previews of how these will turn out, and you can pick the best processing option and proceed to fine tune it even more before saving a 16 bit TIFF file with maximum range. Some HDR users stop at this point. But while you can preserve useful detail with these techniques, even when you try to use HDR carefully and in a non-destructive fashion, these processing techniques are pretty intensive and can seriously damage the realism of the scene. Fortunately you can still have the best of both worlds: recover and even enhance detail beyond what a single exposure can handle, and end up with realistic results.

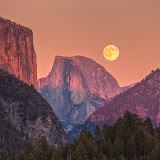
Ellery Lake near Yosemite (2009 HDR).
The next step is by far the most critical, and this is where some HDR users fail to complete the process. The more aggressive HDR techniques can do a good job at enhancing highlight and shadow detail, but used alone, they tend to be lousy at producing a balanced scene with proper contrast, similar to what you'd perceive onsite. The Tone Mapping technique in particular can produce distracting "halos" around objects in your scene that will only serve to scream "rookie" to many viewers. Once you're aware of this you can decrease the strength of the effect as you use the software, but you can also read your 16 bit TIFF HDR result into Photoshop or Photoshop Elements and blend it with your best single exposure edit, or with your Photomatix-averaged exposures to restore much more natural color and light values, while retaining much of the detail enhancement as well. With HDR and realistic (single exposure or averaged) images loaded into two different layers, you can even use Photoshop layer masking to selectively choose areas of the scene which look good in HDR, and select other areas like sky in the non-tone mapped result to simply leave out the blatant halo flaws.

Taking the critical step of blending away HDR flaws doesn't have to be complicated or expensive; if you don't have Photoshop try the layer functionality added into the latest version of Photoshop Elements (about $79.99 in the U.S.). You can download a free trial at www.Adobe.com

3-exposure HDR.  Mono Lake storm (2009).
How do you know when you're done? Think of it like building fine architecture or high end furniture. If the first thing your customers or audience are going to see are nasty sanding marks in the wood, they'll probably think you've blown it, that you have no skill. Similarly, if you can immediately tell at a glance that HDR was used in processing an image, many people will notice the lingering process details before they notice the subject of your image, and that's unfortunate. Weren't you capturing that image to show something other than simply your ownership of a certain tool?

If you can't accurately capture a scene, you'll never get your results into National Geographic. Even if you don't aspire to submit images to them for consideration, it's not all that hard to correct many simple HDR flaws; so why set your sights for image quality any lower?

Now before I set myself up to receive a bunch of hate mail from HDR users, I'm not saying there's anything wrong with uncorrected HDR.  You can produce whatever you want.  Some people are happy with Polaroid images, cell phone images, disposable film cameras and I've taken some of my favorite images on a point-and-shoot digital camera.  People can call anything they want "art," and if they find customers for that, I'm happy for them.  All I'm pointing out is that there is no need to let the HDR process control your results.  You can occasionally demonstrate to your audience that you have skill, that you're in control, even if you choose to stop short of that point and produce artistic, partially-processed results to satisfy HDR fans the rest of the time.  I'd love to see more HDR users develop and demonstrate that skill more often.  Where you go from there is entirely your call.

If you decide to buy Photomatix, you can get a 15% discount by using the coupon code JeffSullivan when you by it from its publisher HDRsoft: http://www.hdrsoft.com/order.php

http://travel.nationalgeographic.com/travel/national-parks/yosemite-photos/#/yosemite-sunrise_2087_600x450.jpg

Wednesday, August 24, 2011

HDRs: Good, Bad, or Something Else?


Select the photo above to visit the Picasa album: "HDRs in 2011 So Far"

HDR, "High Dynamic Range" photography has been around since at least 2003 when HDRsoft released Photomatix 1.0. It has become popular in recent years as some photographers try to overcome sensitivity limitations in digital sensors, and as other photographers use it to make their results look more dramatic. But will HDR succumb to a backlash, as over-saturated images did when Photoshop became widely used, or will it find a permanent place in photography's bag of accepted processes? That may depend on what your aspirations are. If you want to call your work "art" you can do what you want and see whether someone will pay you for it. If you'd love to work for National Geographic, you'd be wise to heed their requirements for their photo contests:
"Minor burning, dodging, and color correction are acceptable. High dynamic range images (HDR) and stitched panoramas are NOT acceptable." They go into more detail in their statement on digital manipulation.

As Ansel Adams developed his approach to photography, it had become very trendy for other photographers to hand-color their black and white prints. Color was new to photography, and the dramatic enhancement that color could add to an otherwise boring result gave many photographers a lot of attention. But over the long run, if a gimmick is what your'e relying on, and everyone has access to that same trick, your work will get lost in a sea of similarly altered results. How many of those photographers who clearly enhanced their photos do we know the names of today? Ansel Adams went in the other direction, working for hours in the darkroom to ensure that his artistic interpretations of a scene were presented in a realistic-looking way.

I've posted a lot of HDR photos to the new Google+ social networking platform recently to research how my use of HDR has changed over the past few years. I used it over 50% of the time in 2008 yet my Spring 2011 album shows the other side of the story, how my use of HDR has dropped below 5% as I follow Ansel's lead to pursue more realistic results. Time will tell whether history repeats itself and today's digital manipulations go the way of hand tinting, but I figure it's always useful to maintain skill in both the realistic and unrealistic camps, so at least whatever look you choose for a given image is a deliberate one, not simply the result that certain software imposes. I'd like to have enough control that I can compose images as an artist and share the light that I experienced, not spend my time as a technician, a captive to a limited repertoire of effects which fail to accurately convey the nature of the place and destroy the quality of that light!

Some people take a strong stance for or against HDR. My take on it is somewhere in between. Like many people I do get weary of seeing some of the most dramatic departures from natural-looking results now that the novelty of that look has worn off, but at the same time I find HDR useful in producing a small percentage of my images.

Some people have said that Ansel Adams surely would have embraced Photoshop and/or HDR, since his photos definitely did not seek to capture a simple reflection of how a scene looked when he saw it:
"You don't take a photograph, you make it."

On the other hand, as far as most viewers could tell, his results were plausibly realistic. Judging by his words, I think he would have certainly explored HDR, encouraged others to do the same:
"I hope that my work will encourage self expression in others and stimulate the search for beauty and creative excitement in the great world around us"

Ansel probably would have chosen to use HDR in a reality-supporting way, which may be new concept for some of the biggest proponents of HDR who advocate its more-than-reality potential.

Which direction should you choose? Sorry, I'm not a fan of "shoulds". I'd advise you to try a lot of different things, then choose your own path. But bear in mind if you enter photo contests that many of the most prominent photographers in the industry started in film, and some of them haven't even adopted digital yet. The over-saturation of Velvia film is fine with them, but they'll be turned off if they think you've applied even the exact same amount of saturation to a digital image. Typical results from HDR software could cause an even stronger negative reaction. Double standard? Sure. Just the way the world works sometimes? Absolutely. The bottom line is, do what you can, and when you develop a following of fans do what you want, keeping in mind the intended audience for your work.

If you've never tried HDR, you can download a copy of the latest Photomatix software to try at www.HDRsoft.com. Play around with it, and have fun! Search my blog for "technique tips" to see some my prior advice on how to prepare images for HDR processing.

If you decide to buy Photomatix HDR software, I do recommend the version with an interface to Lightroom and Photoshop, to give you the most control.  You can get a 15% discount by using the coupon code JeffSullivan when you by it from its publisher HDRsoft: http://www.hdrsoft.com/order.php

Here are a couple of non-HDR images to show what you can do with standard image editing tools such as Adobe Lightroom:

Tuesday, January 20, 2009

Why Would Anyone Use HDR? It's Unreal!

Tree on Fire, originally uploaded by Jeff Sullivan.
I see that question a lot posed online, in discussion groups, even under photos. To me liking Photoshop but not liking HDR would be analogous to liking wrenches but not liking hammers. Sure, many people wield HDR poorly, but many carpenters wield a hammer poorly too... what could that have to do with hammers? In other words, what does a poor result have to do with the (value of or utility of) the tool?

Many people vilify HDR; I don't get it. Most people play guitar poorly, but that won't keep me from enjoying the work of many talented guitarists. Of course everyone's entitled to their opinion and their own tastes. If classical music fans want to say, "Ugh, I think I hear a guitar in that piece!", or photography fans want to say "Ugh, Galen Rowell used graduated neutral density filters!", that's their privilege. Surely HDR software will get better and better at expanding dynamic range while producing unobtrusive results, and as that value is delivered for more and more shots, I'll have terabytes of exposure-bracketed images to draw upon.

I find HDR a useful tool about 80% of the time, with maybe 5-10% of all shots I choose to keep being simply not possible without it.

My example above is pretty obvious, and results like that may be an acquired taste, but can you identify which of the following photos was processed with HDR software and which were not?

Sunset at Mono Lake, Eastern Sierra, California


Merced River Calm
Fall colors reflectig in the Merced River, Yosemite National Park

Half Dome and fall double rainbow around sunburst in Yosemite Valley


Perhaps more to the point, which do you like better?  If you can't tell how an image was produced, does the process or tool used matter?  As I browse folders of processed results, I often can't tell how my images were produced until I look at the file name.  Those images where the processing does not speak louder than the subject, those are the successes.

As for whether or not a result matches an original scene, no photograph does (unless the entire scene is pure white or pure black).

Consider the scene's brightness. An original scene contains light in a range of up to 17 stops, our eyes can handle 13 stops, a film camera can handle about 11 stops, the best full frame digital cameras at most 8-9 stops. Most of the digital cameras with small format sensors that most people shoot with are probably closer to 4-5 stops. How do you restore some fraction of the shadow and highlight detail in those 8-9 lost stops of light, if not with High Dynamic Range techniques?

Then consider the color. The CCD sensor has one range of colors that it can sense. The RAW format it saves the file in has another range of colors that it can store. The monitor you display it on has yet another. Eventually the image gets converted to 8 bit JPEG format for printing, trying to represent the infinite shades of natural color while preserving only 256 levels of color for red, green, and blue. Then the printer, which uses a subtractive CMYK color scheme of Cyan, Yellow, Magenta and blacK (which doesn't match or directly overlap any of the other color spaces used along the way).

Then consider human perception. Our brains try to assign the brightest thing in a scene to be white. That's we have to have our cameras and software adjust images to a certain "white balance" (strictly a human perceptual distortion). The ambient light available when viewing an image (outdoors in sun, shade, under incandescent light, flourescent, etc) seriously affects our perception of the result as well.

Our eyes and brains are not carbon copies from person to person. Some people report noticeably different perception even from eye to eye. There's truly no such thing as "reality" when it comes to white balance and human color perception.

So given the essentially insurmountable issues at every step of the process, how can anyone claim to produce an accurate copy of a given moment? What would that even mean... accurate to an electronic device, to one person, or to which subset of people, and under which ambient lighting conditions for viewing?

Must we "go with the flow" and pretend with the charlatans that accuracy is possible (or even a desireable goal), or is it safe to observe that the "just as it happened" emperor truly has no clothes?

To each his own though... everyone is entitled to like or not like something for any reason or for no reason. HDR simply happens to be one tool that I find not just extremly useful, but indispensible. I'd sooner part with even basics like UV filters and circular polarizers.

If photographers aspire to be some sort of sterile recording device, then they can be replaced by webcams nailed to trees or doorjambs. The very definition of art requires human involvement and influence... a departure from sterile reality. Exercise your human side, your artistic side... any departure from the fruitless pursuit of perfection will set you free.

If you decide to buy Photomatix HDR software, I do recommend the version with an interface to Lightroom and Photoshop, to give you the most control.  You can get a 15% discount by using the coupon code JeffSullivan when you by it from its publisher HDRsoft:
http://www.hdrsoft.com/order.php

Wednesday, December 26, 2007

Tame HDR to Produce More Realistic Images


For about a year now I’ve been bracketing exposure on most shots so I have the option of using high dynamic range (HDR) software to increase highlight and shadow detail in my shots.

As noted in this article at NatureScapes.net, digital cameras can capture a range of about 8 stops of light, while film cameras cover about eleven, and your eye covers 14, while an actual outdoor scene may cover 17. HDR software can help you restore some of that range of light and color that your film camera could capture, or that your eye might see.

Many people are now experimenting with or using HDR software, but it can be difficult to produce natural-looking results. By now the majority of my images on this site have some degree of HDR postprocessing involved. In the interest of timely posting, many are first pass edits that I'm not fully satisfied with or done fien tuning yet, but you can decide for yourself whether or not I'm on the right track and my experience might offer some value for you.

Here are some techniques and tricks I've learned to better control my HDR results in an attempt to produce more natural results. I consider this to be a list of basic to intermediate tips. I'm working on a list of more advanced advice on tips and tradeoffs to consider when handling some of your more challenging shooting and postprocessing situations.

Shoot RAW and work only from file formats that preserve maximum tonality data
- Compared to JPEG which has 8 bits of color information, my RAW files have 12 bits, and the extra 4 bits provide 16X more shades of each primary color. In simple terms the HDR software works with 4096 levels of each color instead of 256. The difference can be very noticeable in the results, especially in areas with subtle shading such as blue sky and orange sunsets. Working with JPEG files frankly produced crappy results for many of my shots. Some new cameras just starting to ship now produce RAW files with 14 bit color depth, so the HDR software will have over 8000 levels of each primary color to work with in RAW files instead of 256 in JPEG.

Consider your brightest and darkest shots from any HDR sequence. Using JPEG you're settling for 256 color shades instead of 4096 in 12 bit RAW, dramatically reducing subtle shades by a factor of 16X in exactly those darkest and lightest areas that you're trying to salvage. Assuming 2 stop spacing of shots, perhaps the results where I've noticed a clear difference occurred with colors and brightness values occurring in the 4 ev stops beyond all of the other exposures (the more detailed color data two stops above and two stops below all other shots, no matter what total range you're covering).

- RAW also enables you to change the white balance setting. Want to better preserve the color in your sunset? If your first HDR run on a shot reduces the color too much, try running HDR processing again using the shade or cloudy white balance setting for a warmer (more orange/yellow) tone. You don’t have that option, and can’t achieve the same results, working from JPEG files.

- As noted by the NatureScapes.net article:
Further, the camera applies a tone curve, compressing shadow tones in order to favor highlights. Since I personally find that shadow tones contribute a lot to my HDR work, I would not like to sacrifice them. Finally, introducing JPEG compression artifacts (however slight) into the HDR process may degrade image quality.
I understand there are arguments in favor of shooting JPEG. Typically the benefits raised are to get more continuous frames, more storage capacity, and potentially minimize subsequent workflow effort in RAW conversion. However, in my opinion, these factors are not particularly relevant for HDR work, especially landscape photography as discussed here.


- If you ever intend to "go pro" and submit to stock photography agencies, you'll be happy that you saved the original 16 bit TIFF output from your HDR runs (retaining your full 12 or 14 bit RAW quality, further expanded via HDR into the 16 bit TIFF color space), and don't have to re-run HDR interactively on thousands of archived RAW files to retain value from your shots. (I'm not talking about "microstock" agencies, which are fine with you spending hours to produce and manage high quality JPEG images that can be sold for pennies for online work.)

Use a Tripod and Use Auto Exposure Bracketing
- The less you touch your camera, the more likely your shots will overlay well and produce a sharp image. HDR software such as Photomatix may have the functionality to attempt to get misaligned shots to register well, but don’t count on it; it seems almost as likely to further misalign your shots. Having the camera take the shots as fast as possible also reduces any movement within the scene (leaves, clouds, etc.) that might turn into distracting ghost images in the result... better to prevent the problem and spend any postprocessing time doing something creative rather than trying to repair or salvage a shot with motion artifacts.

Use Interactive Mode, not Batch
- The default settings for Photomatix software for example seem to desaturate and overexpose many images and leave them with unrealistic halos of light around dark objects. HDR processing can reduce noise in some cases, enhance it in others. If you care about the quality of your results, all of these challenges are best faced in interactive mode.

Tame Halos: Set Light Smoothing to High or Very High
- This is your #1 tool to fight distracting light halos that may flag your results as HDR output, what some people might refer to as "overcooked." I set it "very high" at first, then back off a notch or two to see how much HDR the scene can handle.

Tame Noise: Adjust Micro Smoothing
- On some sequences HDR can cancel out noise, for others it might interpret severe noise as valid data and enhance it! Increase the Micro Smoothing setting to smooth out HDR-enhanced noise.

Restore Color: Postprocess in Photoshop or Photoshop Elements
- Since your HDR software shifted light intensities and color tones, something as simple as Auto Contrast and/or Auto Color Correction can make a lot of difference when trying to restore natural-looking lighting and color. Noise reduction can be needed too.

Restore a Natural Look: Layer and Blend HDR Result with a Single Exposure
- Sometimes my best results with HDR software are not acceptable, but neither are my results trying my best to balance the exposure and color in one of my single exposures for the same shot. Consider blending both your best single edit in with your HDR result! The single edit will most likely have better color and shading and the HDR result will have more shadow and highlight detail. A 50/50 or 60/40 blend may still not be a perfect result, but it may be better than either of the two results before you blended them!

I'd be curious to know what other techniques people have found useful, specifically when their intention is to create realistic-looking results.

If you decide to buy Photomatix, you can get a 15% discount by using the coupon code JeffSullivan when you by it from its publisher HDRsoft: http://www.hdrsoft.com/order.php

(I'm still tuning the focus of this site. If you like my inclusion of experience and technique tips in this blog, drop me a line to let me know in my guestbook. Thanks!)