Showing posts with label Technique tips. Show all posts

Monday, August 03, 2015

Planning Sunset and Sunrise Landscape Photography with TPE 3.3

Sunrise at Topaz Lake on the California / Nevada Border
Planning landscape photography has traditionally been a process of considering a combination of location and weather.  If you have a general understanding of the geography of a region, you could look at weather forecasts a few days ahead of time and anticipate where and when the best photographic opportunities might present themselves.  During the course of a day you could modify your plan even further, and decide where to be for sunset based on where you see the best cloud formations developing, and where enough breaks in the clouds might let light through.

In recent years the availability of maps and satellite imagery online in programs like +Google Maps made the location planning easier.  The availability of fairly detailed weather forecasts days in advance through the National Weather Service made the choice of where to go in a region a little easier.  Apps like   +The Photographer's Ephemeris added lines to show the direction of the sun and moon at any time of day or night, so you could anticipate the exact sun rise and set time, general sunlight illumination during the "golden hour" before sunset and after sunrise, as well as anticipate the location of the moon.

Forecast for August 2, 2015
The latest version 3.3 of The Photographer's Ephemeris uses the SkyFire service to check weather forecasts to predict sunrise and sunset color, and show a color-coded overlay on a map of the region your're in.  The more red the color, the higher the probability of sunset color,  The mroe blue to clear it is, the lower the probability. You can see the forecast two to four days in advance depending upon what level of service you'e enrolled to receive.

Another handy feature of SkyFire is to compare forecasts for a list of favorite locations that you've saved, so you can decide between locations to drive to, in order to have the best odds of a nice sunset.

I've tested these features a number of times now, and they do well at predicting when there will or won't be sunset color.  Weather forecasting is notoriously imprecise, so of course you can't predict the direction or extent of the color, but so far the correlation between the SkyFire forecast and the outcome is impressive.

Here's the sunset that actually occurred with the forecast shown to the right for August 2:


Multi-day SkyFire forecast on TPE
The multi-day SkyFire forecast format is shown to the right. The bright red box showed a potentially vivid sunrise opportunity at Lake Tahoe.

The SkyFire service is an optional in-app purchase for TPE, with prices as follows:

Top In-App Purchases

  1. Location Synch (1 year)$0.99
  2. Skyfire Plus (3-months)$14.99
  3. Skyfire (3-months)$9.99

There is also a new location synchronization feature, which finally enabled me to sync my iPhone TPE with my Windows TPE.  There was a procedure to do it before that I had not been able to complete.  With this new method it was quick and simple.

If you don't already have TPE, here's a link that you can use to find it in the Apple iStore:

The Photographer's Ephemeris - Crookneck Consulting LLC

Crookneck Consulting also offers a Photo Transit app which enables you to anticipate what focal length you'll need to capture a certain field of view to get the shot that you want:

The Photographer's Transit - Crookneck Consulting LLC

I'm also testing TPE 3.4, so I'll probably have some details on that for you shortly!

Another sunset accurately predicted by SunFire

Tuesday, June 09, 2015

RAW vs JPG for Mobile Phone Photography - LG G4


LG G4 RAW capture, manual exposure, unadjusted, cropped to 2047 x 2047, saved at 90% JPG quality, Adobe Lightroom 5.7.
I continue to experiment with manual exposure and the ability to capture images in RAW format on the LG G4 mobile phone, since it's one of the first (the first?) phone cameras to offer that capability.  Above is the RAW file.

Next let's look at a copy edited in +Adobe Photoshop Lightroom mobile on +Android:

Image adjusted in Adobe Lightroom mobile app, color, contrast, etc, vignette applied.
The original files are 5312 x 2988 resolution, 16 megapixels. This was cropped square, top to bottom in the original frame, so it was 2988 x 2988, but it's displayed at 2048 x 2048 here.  Looking at the Lightroom folder on the LG G4, that downsize in resolution seemed to happen automatically in the Lightroom software.

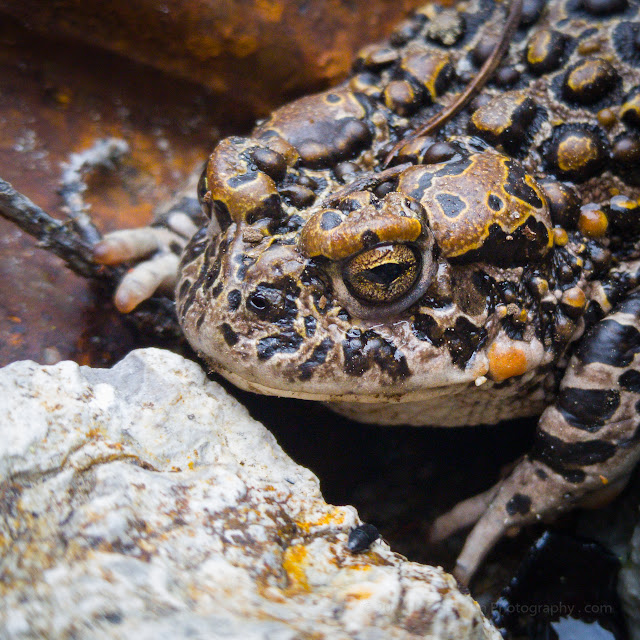
Now I'll upload the original RAW file here, saved to JPG (80% quality) so it will display:
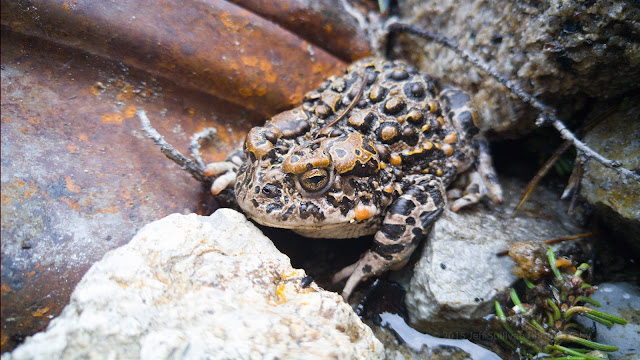


The unadjusted RAW file was 20 MB, then saved to JPG 80% resolution it's now 6.56MB
But guess what I was actually taking a picture of... I was trying out an 8X digital zoom on the toad's eye from about 4" away, so I could see how a macro-like the result would turn out.  I was shooting in RAW + JPG mode, and this zoomed view saved at the same and with the same file name as the wider RAW file above:
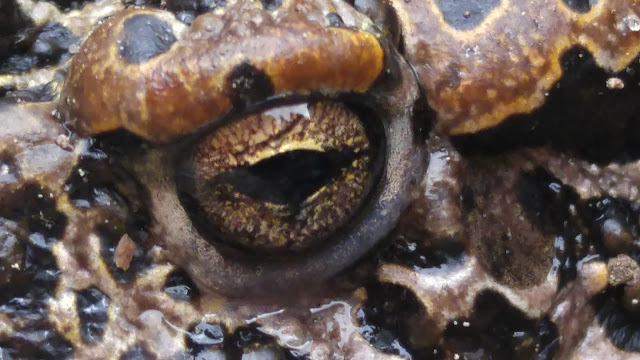
8x zoom from 4" away! (JPG file created by the LG G4 alongside the RAW image with wider field of view)
The LG G4 has an 8-way optical image stabilizer, improved from the 4-way OIS on the LG G3.  Multiply hand shake with 8X zoom, arms outstretched to ground level, a few inches from the subject, and this is an impressive result.  Next I'll have to try it with the phone stationary to test the phone's close focusing and image quality without unsteady hands being a factor.

What's interesting about this 8X zoom shot is that the file still saves at 5312 x 2988.  If you click on the zoomed JPG, it isn't noticeably jagged with blocks of pixels duplicated many times to the higher resolution.
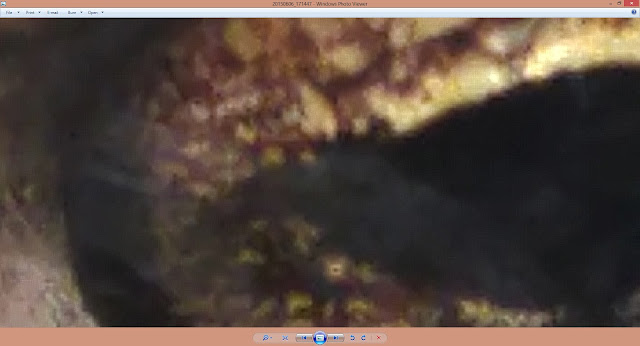
Zooming in on the JPG file saved by the LG G4
Some of that could be dither patterns to map RAW data to the smaller color palette of 8-bit JPG, but there could be some interpolation involved to predict and fill in data as well, so let's look at the JPG save of the RAW file to see what the actual pixel size is.
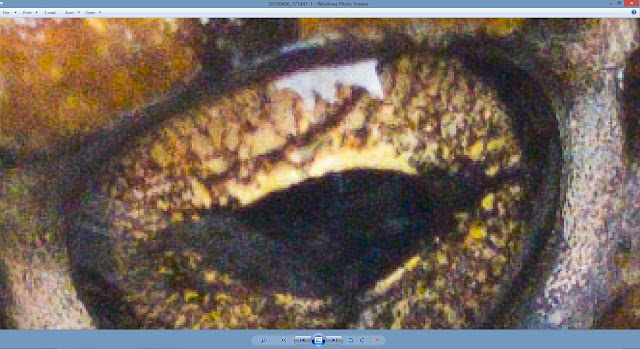
Zooming in on my 80% quality JPG save of original RAW file to see actual pixel size.
Sure enough, we were a bit over-zoomed on the LG G4's own JPG save of the 8X digitally zoomed image, but it's nice to see dither patterns (in that prior, tighter image) used to approximate more colors.  that's what printers do as well, when you send them a file format with more colors than they have dots of color to represent.

But we're still not looking at the original RAW data... how much did my decision to save at only 80% JPG quality affect the output?  Let's look at the file still in Lightroom, since it should be able to represent the original DNG RAW colors using the full color pallette of the display card.  Here's a screen shot of that:
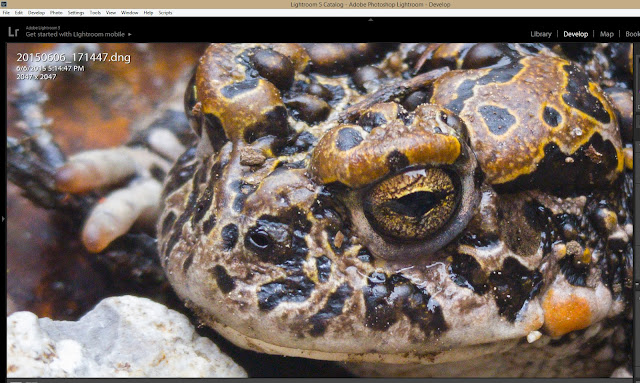
Now the RAW file adjusted, this is as far as Lightroom would let me zoom on my 1920 x 1080 display.
But screen shots are saved in JPG, so by the time someone shows that to you, you still don't get the full data present in the RAW file.  Let's pixel peep on that anyway, fully understanding and acknowledging the limitations:
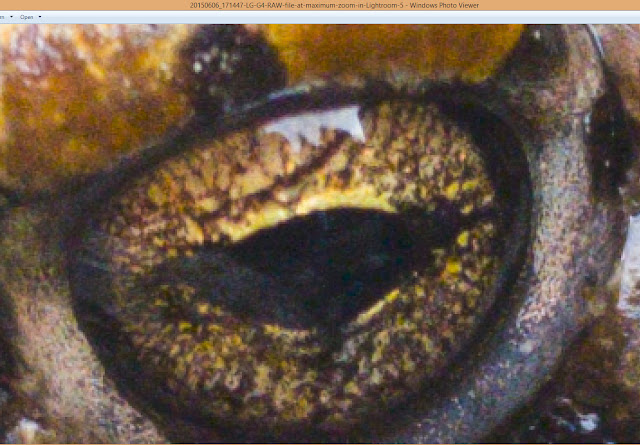
This screen shot of the adjusted RAW file, as it appears in Lightroom above, was effectively converted to JPG in Windows
The screen shot of the RAW file in Lightroom was effectively converted to JPG in Windows, but it already looks better than the RAW saved to JPG at 80% quality, so that quality setting was a factor in the prior crop.  Let's now crop the eye first, then save the RAW to JPG at 100% JPG quality.
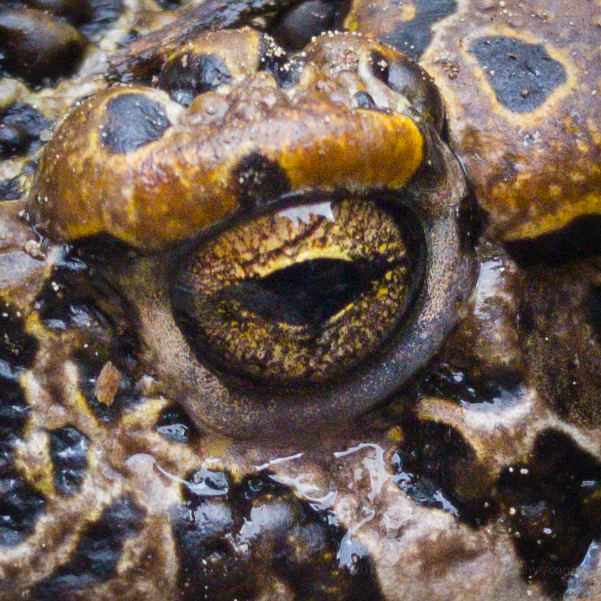
RAW file cropped to 601 x 601 pixels, saved at 100% quality JPG, inserted into blog at 600 pixels
I've cropped that last image to be inserted into the blog at a 1:1 size, not over-zoomed, and it's 100% JPG quality, so reduced in quality from the original RAW but about the best we can do in JPG format.

Let's repost that unadjusted 8X zoom RAW file that the LG G4 saved again here, for a fairly direct comparison:
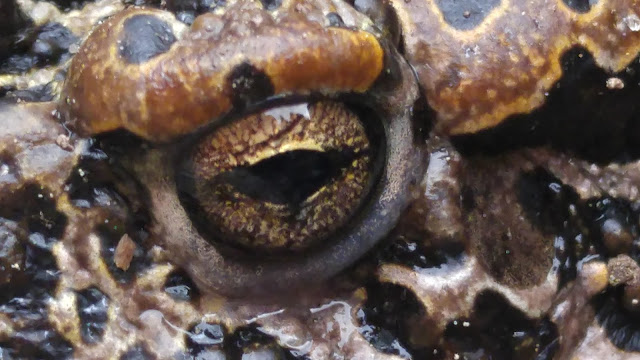
That 8X zoom file the LG G4 saved alongside the wider view RAW file.
The adjusted/edited RAW file looks better than the camera-saved JPG file, but that's the whole point of saving RAW in the first place, to have the option to work on the original sensor data and produce a better edit, if and when it makes sense to invest that additional time.

If you're on the run and need to post a quick preview, many reviews confirm that the camera on the LG G4 will produce JPG files comparable with other top phone cameras.  But such reviews of straight-out-of-camera results clearly fail to fully show the full strength of the LG G4 camera, and its ability to produce stunning results, edited either in a mobile app (second from the top above) or in traditional desktop editing software (below).
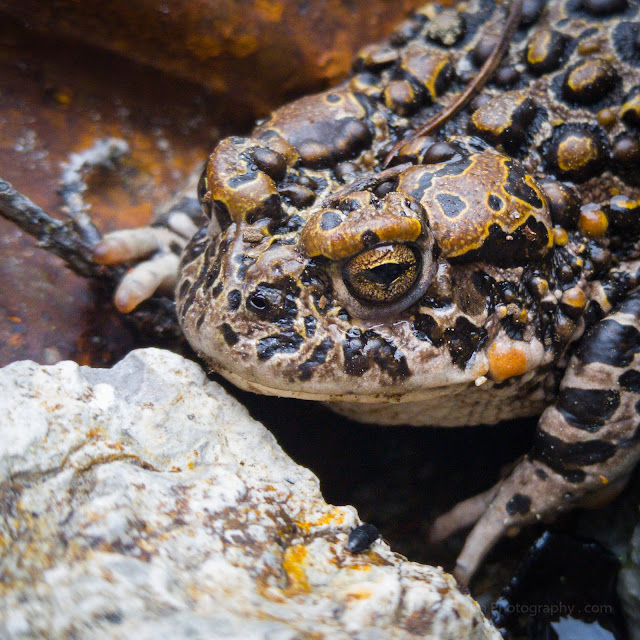
Adjusted in desktop version of Lightroom (5.7), brightness, contrast, etc, less vignette applied than in mobile version
Conclusion: RAW is clearly the way to go when quality matters, which should give the LG G4 a leg up on competitors for a while, until more of them join the RAW party.

I had been provided with the LG G4 to preview it prior to its public release, but now I have to make a personal decision on which phone to use going forward.  I find that it's what I reach for 90% of the time for general image quality anyway (including low light performance, excellent image stabilization and good quality quick JPG HDRs).

Upon further inspection, the ability to select manual exposure and produce RAW output isn't just an incremental feature, it opens up a while new category of mobile phone camera.  Consider what third party apps can do with that... using exposures up to 30 seconds, producing higher quality results from multiple exposures and HDR or other exposure blending performed in post-processing software.  The applications will span the full range of what app developers can dream up.  This starts to achieve the promise of putting mobile phones in direct competition with digital cameras and even DSLRs.  While lens selection and aperture choices will continue to give DSLRs the edge for many specialized and professional applications, the expanding options and improving image quality from smartphones will continue to expand their appeal as the camera most likely to be quickest into your hand as shooting opportunities arise.

Friday, March 13, 2015

Gearing up for 2015 With a ProtoMachines LED2 Light

Light painting night photography under moonlight in Bodie
One of the primary things to manage during night photography are your light sources. You may have light pollution from near or far incandescent light, additional light from the moon, a strobe (flash), and handheld lights such as a colored LED, flashlight or headlamp. Illumination from various types of lights ranges from "cool" (blue in tone) to "warm" (yellow). Fortunately you have a lot of flexibility to adjust the warmth or coolness of the lighted area in post-processing software such as Lightroom. On the other hand, it's good to do as much in-camera as possible, so if you can tune your light to have the desired effect while you shoot, that can save time on the post-processing side.

The result of a quest for warm, cool and colored lights
I've posted on the variety of lights I've bought, used and carry, but at some point carrying so much gear gets to be a bit of a burden, especially when moving around cluttered scenes on dark nights.  Even trying to keep costs low, over time I've ended up spending a fair amount just to have a selection of different light temperatures and intensities.  And the selection is one of compromises, incandescent lights being seen by the camera sensor as being very warm and yellow, while most simple LED lights are seen as very cool and blue.

"Old school" light painting in Bodie, with incandescent lights
After having customers show up at my Bodie night photography workshops last year with ProtoMachines LED1 and LED2 lights last year, I just picked up an LED2, which should dramatically reduce the volume and weight of the light painting gear I carry, give me a wider range of options, and reduce the number of batteries I need to keep charged.  I can pre-program warm and cool settings for a range of white balance settings, or various RGB values for creative color work.  The intensity can be adjusted in a range of up to 9 stops, so the brightest setting should be 2 to the ninth power brighter than the dimmest one, a range of 512x.

It's going to be nice to have a light with adjustable color and intensity, all in one small package.  It'll be fun to see what works best for lighting up foreground subjects under full moon, no moon, and mixed lighting scenarios!

ProtoMachines LED2 light for night photography

Monday, September 01, 2014

The Redemption of High Dynamic Range (HDR) Software

Joshua tree in Hidden Valley, Joshua Tree National Park
When I captured the image above in early 2009, I used a Canon EOS 40D.  Although that was the first Canon camera marketed as producing 14-bit RAW files, it wasn't always clear from the results that it was producing the implied 4X more color resolution compared to prior models producing RAW files with 12-bits of information.  This is the original single exposure image, fully post-processed recently in Adobe Lightroom 5.  In that single exposure result I was frustrated by the relative lack of detail in the shadows, and the highlights are lacking in detail as well, so the dynamic range, the ability of the camera to capture a wide range of bright to dark light values, is clearly inadequate.

Fortunately the image was captured in a 3-exposure sequence, so as I revisit the images from that day now, over 5 years later, I can try post-processing it using a current version of Photomatix HDR software which offers a "natural" mode which produces fewer artifacts than prior versions did..  One thing that is clear is that there is a significant amount of shadow and highlight detail present in the scene which is brought back into the HDR result.


3 exposures post-processed in Photomatix HDR software


I had been unable to produce an acceptable result for this image in 2009, but using current tools, significant highlight and shadow detail can be recovered.  High Dynamic Range software is finally getting to the point where it can produce high dynamic range.

Six days before I had captured this photo, I had written a blog post including the following:
"Many people vilify HDR; I don't get it. Most people play guitar poorly, but that won't keep me from enjoying the work of many talented guitarists. Of course everyone's entitled to their opinion and their own tastes. If classical music fans want to say, 'Ugh, I think I hear a guitar in that piece!', or photography fans want to say 'Ugh, Galen Rowell used graduated neutral density filters!', that's their privilege. Surely HDR software will get better and better at expanding dynamic range while producing unobtrusive results, and as that value is delivered for more and more shots, I'll have terabytes of exposure-bracketed images to draw upon."
Why Would Anyone Use HDR? It's Unreal!http://activesole.blogspot.com/2009/01/why-would-anyone-use-hdr-it-unreal.html
While the degree to which the HDR processing itself is still noticeable is open for discussion, I didn't care for the original which was overly light and dark at the same time, so this strikes me as an improvement.  It is also a good example of that concept I proposed which proposes that future advances in software may help us overcome current limitations in hardware, provided that you record more data than your camera can capture in a single exposure.  The way to do that is to capture an exposure-bracketed sequence, where you capture both darker and lighter exposures than your best attempt at a single exposure.

At that point in 2009 I was using HDR software roughly 80% of the time, in spite of its crude state and sometimes objectionable artifacts.  Shortly after upgrading to a Canon 5D Mark II, with a full frame sensor and much better dynamic range,  I was able to quickly drive my HDR usage down to 10% and then 2-3%.  HDR could still rescue images which could not be salvaged in single exposure form, so it remained one of many tools at my disposal, but it became more of a tool of last resort than a key piece of my workflow.  

Unfortunately by that point the use of HDR had developed negative connotations with many photographers, so in 2011 I felt the need to explain my rationale for using it at all:
"Some photographers have fallen in love with High Dynamic Range (HDR) post-processing, producing dramatic but strange results. Other photographers dismiss the often wacky-looking HDR results as 'technicolor vomit' and note that any monkey can move a slider in software to make a scene look strange, the talent lies in making a single, flat camera exposure look more like what we experienced onsite. Unfortunately, the range of light present, the dynamic range of the scene, is often far beyond what a single camera exposure can capture. So like so many polarized debates these days, the prudent path may lie somewhere in between. " 
HDR Isn't Just a Crutch, or a Crime
http://activesole.blogspot.com/2011/10/hdr-isn-just-crutch-or-crime.html 
As I look back now, with improved HDR software providing even more useful utility, as I try to process photos from my pre-2009 cameras I still have challenges producing excellent results from some of the lighting conditions I found myself shooting in.  So although my own pendulum of HDR use swung from strong support to a bias against it, as my use is rising again it's still a centrist view: I'll use it when it's useful, and it is becoming more useful.

Merced River Calm
HDR 2014, Canon Digital Rebel XTi photo captured November 2006
If you decide to buy Photomatix, you can get a 15% discount by using the coupon code JeffSullivan when you by it from its publisher HDRsoft: http://www.hdrsoft.com/order.php

Tuesday, April 22, 2014

Planning Milky Way Photography


Milky Way over Mono Lake Tufa Rock Formations
By now most of us have seen stunning Milky Way shots, but when we go out at night in the Northern Hemisphere we find that the Milky Way is not prominent in the sky all of the time and the moon often interferes with its visibility as well.  The best nights and times are fairly easy to anticipate, so let's review them.

The Milky Way is like a big, flat disk, with a fatter portion in the center, much like flying saucers are depicted.  At least arms spiral out from the center, and our solar system is partway out on one of these arms.  So while the disk of the Milky Way which we're in looks like a stripe of stars across the sky, when we're looking towards the larger center of the disk containing more stars, it's brighter.  Due to the tilt of the earth's rotational axis, that bright center of the Milky Way is highest in the sky in the weeks around the Summer solstice.

As for best viewing conditions, the dark sky days around the New Moon are best, when the light of the stars in the Milky Way seem brightest and offer the greatest contrast against the dark sky background.  There is an added complication as the position of the Milky Way and constellations change nightly, moving east to west further each night, until the constellations end up in the same place in the sky at the same time the following year.  The constellations moving all the way around us in 12 months to return to the same place in the sky is similar to the movement they make in 24 hours, so to complete the trip around in a 12 month year, each month the constellations rise 24 divided by 12 = 2 hours earlier, 30 minutes per week.  So Whatever time the Milky Way rose above your horizon last week, it'll be 30 minutes earlier this week and 2 hours earlier on the following month.


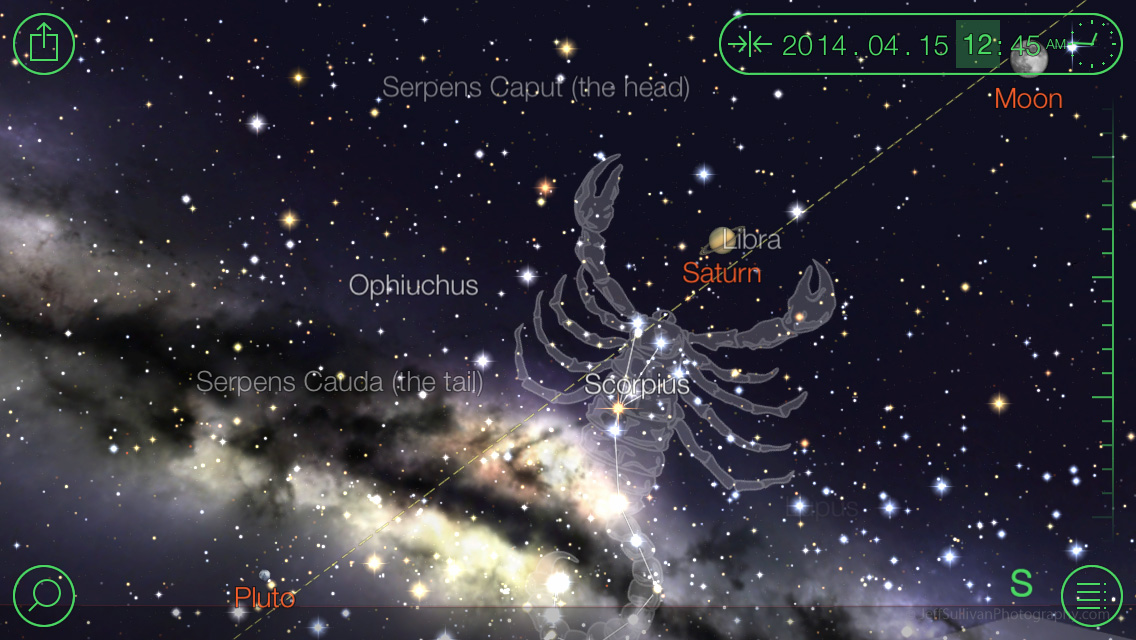
Fortunately you don't have to make a bunch of observations and calculate future times, there are apps to do the work for you.  There are a number of stargazing programs out there for both interpreting the current sky and anticipating how it'll look at some date and time in the future.  I use StarWalk, which provided the following display last week as the April 15 lunar eclipse was ending:


When you see that trident-shaped pattern of Scorpius coming up along the east to southeastern horizon, you know that the bright galactic center of the Milky Way is not far behind.  It would have been 2 hours later, 2:45 am, to reach this position in the sky four weeks earlier.

Now let's look at other months.  Note the time changes in the upper right corner as we go from early May to late May, as the moon rises roughly 90 minutes earlier after three weeks pass:


As we jump forward to dates close to the new moon dates in late June, July and August, rise time is no longer an issue as the Milky Way is already in the sky once the sky gets dark enough to see it.  So June, July and August are the most convenient months to shoot it, since you won't have to wait long after sunset to start shooting.  There's a term astronomical twilight to describe when the sky is fully dark, and a program such as The Photographer's Ephemeris can tell you when that is, both at night after the sun sets to the west and in the morning as the sun approaches to the east.


You'll notice that the Milky Way starts the night a little more vertical or "tilted up" in the sky each month.  It's also a little further along the southeast to southwest path that the galactic center takes in the sky, so you can use that knowledge to plan specific compositions.  The Galactic center also starts a little lower in the sky as you get further form the Summer solstice.

So using the new moon dates each year and a program like StarWalk, you adjust the date and time to pre-visualize what the sky looks like and determine approximately how many compositions featuring your favorite natural or man-made landmarks will look.

For more information on how to shoot the Milky Way once it's in the sky in front of you, read my prior blog post: How to Take Milky Way Photos.

To take the concept even further, you can capture sequential photos of the Milky Way and convert them into a time-lapse video like this!

Tuesday, October 29, 2013

Post-processing: Color vs. Black and White vs. Lightroom Preset

Inside the Standard Mill at Bodie, single exposure


Upon arriving at this part of the Standard Mill it was clear that the range of the light of the scene would exceed the dynamic range of the sensor. The highlights would be blown out to white, and shadows would be excessively dark... not at all like what we perceive onsite. So I set my camera to capture 5 exposures.

To recapture the highlight and shadow detail, I decided to try HDR processing.  I pre-processed for color adjustment and noise reduction in Lightroom, transferred the 5 files in TIFF format to Photomatix (using its direct interface from the Lightroom File menu), and tried to pick the most realistic HDR mode and make adjustments.

Trial 1: Lightroom -> Photomatix -> Lightroom
Trial 1: Lightroom -> Photomatix -> Lightroom, HDR in color


When done in Photomatix the save operation transferred the result in TIFF format back to Lightroom.  I post-processed the HDR result in Lightroom again to get the best possible result. It was hard to balance the blue light coming in through the windows and the warm tones from the overhead incandescent lights.

Not satisfied with the colors in the color HDR result, I then tried a similar workflow but instead tried a black and white conversion in that middle Photomatix step.

Trial 2: Lightroom -> Photomatix B&W -> Lightroom
Trial 2: Lightroom -> Photomatix Black &White -> Lightroom, HDR in Black & White


The black and white result from Photomatix was saved in TIFF format back to Adobe Lightroom 5. Shadow detail is great, but even having captured 5 exposures in two different exposure ranges (using exposure compensation in addition to exposure bracketing) the highlights didn't recover well, and there's some lens flare from the windows as well. I did a little dodging and burning, but I wasn't feeling that the electrical equipment was appropriately ending up as the subject, what a viewers eyes would be drawn to.

I don't tend to shoot a lot of architectural subjects, but when a natural color result wasn't turning out and the lens flare and the composition didn't favor a black and white treatment, I decided to try creative filter processing presets in Lightroom.


Given the historical nature of the site, the result from Color Presets -> Aged Photo seems to fit the subject well. I'm normally not a big fan of sepia type effects, they tend to be overused and the tones tend to be a little monotonous, but Aged Photo left enough color and black in the photo that I felt the effect didn't entirely steal the show like many treatments, and the focus on the electrical equipment was restored (compared to a monochrome treatment such as black and white for example).

Having given this a rest for a week or two and looking at it with "fresh eyes", I would be curious to go back and mess with the exposure, contrast and black levels on the three pieces of equipment and see if I can get them to stand out more, in a subtle and not overly flashy or gimmicky way. Our eyes are drawn to areas of brightness and/or high contrast, so it may be possible to pull off using radial cursors on the equipment in Lightroom.

Here's the outcome of adding some spot edits on the three pieces of electrical equipment using the new radial cursor in Lightroom 5:


The difference is subtle, but I think in each case the electrical equipment serves as more effective subject matter in the overall scene.  Which one is "best" is really a subjective decision and there's no right answer, but I do feel that all three edited results produced using bracketed exposures turned out as a more interesting and usable result than the individual exposure, and a little extra post-processing in Adobe Lightroom to focus on making the equipment stand out helped them each even more.

If you haven't tried Photomatix, a 30 day evaluation is available through the software's publisher at www.HDRsoft.com.  Several of the many processing modes offered place watermarks on the results, but if you do license the software, the watermarks can be easily removed.  You can get a 15% discount by using the coupon code JeffSullivan when you by it from HDRsoft: http://www.hdrsoft.com/order.php

Tuesday, October 08, 2013

Landscape Photography Show Episode #20 - Moon Photography


Here's the recorded tutorial on YouTube:  http://youtu.be/Wgb_r9JlKRM


I can't wait for the next full moon, but +PhotoPills will also tell you what alignments are coming up with any moon phase!
The app PhotoPills is available here:
https://itunes.apple.com/us/app/photopills/id596026805?mt=8&uo=4&at=10ldnC

Tutorial on Moon Photography Planning

Moon in lunar eclipse, perched on San Francisco's Transamerica Building
Tonight I'll be broadcasting a live tutorial on how to determine exactly where to stand to place the moon on top of a natural or man-made landmark.  Here's a link to the event if you'd like to join us: http://goo.gl/DSXu8Z

In this example, I predicted where to catch the full moon during a lunar eclipse so its path would pass the tip of the Transamerica Building in San Francisco.  Using eclipse predictions, lunar elevation angle and compass direction, I used the height of the tower to predict how far away I'd need to stand and in what compass direction.  I mapped that point on Google Earth, showed up a little early to start shooting hundreds of photos to created the time-lapse sequence, and it turned out that I pretty much nailed it!  The center of the moon passed right across the tip of the tower.

New tools make this sort of planning easier than ever! We'll be demonstrating the PhotoPills app.  If you'd like to purchase the app to follow along on your smartphone as we show the features, follow this link to buy it: https://itunes.apple.com/us/app/photopills/id596026805?mt=8&uo=4&at=10ldnC

Here's a time-lapse video I created of the moon as it approached and passed the Transamerica Building:


This video was featured on Phil Plait's Bad Astronomy blog on Discover Magazine:
http://blogs.discovermagazine.com/badastronomy/2011/12/12/lunar-eclipse-time-lapse/
Lunar eclipse time lapse : Bad Astronomy
Moon Over Half Dome, Yosemite National Park

Update August 2014: Thanks to the +Royal Observatory Greenwich in London for including my moon rise image in your video about the Astronomy Photographer of the Year 2104 competition!

Read my 2012 blog post about my pursuit of this image:
Moon Rise over Half Dome in Yosemite

See my notes below for tutorial blog posts and a copy of the demonstration/tutorial video described in this post.  Here's the Royal Observatory's new video on the Astronomy Photographer of the Year competition:


Here are some of my lunar photography and astronomical alignment examples for you to enjoy:

Moon Rise Between Half Dome and El CapitanEclipse Moon Set Under Belt of VenusMoon Rise Behind Half DomeVane AttemptSunrise Sunspot ViewJoin Me In Yosemite This November
Mono Lake Sunset Moon Rise SaturdaySunset Full Moon Rise over Mono LakeLunar Eclipse, Landing on the Transamerica PyramidMono Lake Sunset DreamFull Moon over Bay BridgeMono Lake Moonrise (Re-edit)
Crescent Moon Setting Behind Auburn CourthouseSolar Rainbow in Yosemite ValleyTree and MoonSouthern California SunsetBorrego Badlands MoonriseYosemite Moonrise
Monitor Pass Sunset Sun RaysMoonrise by Half DomeDawn Full Moon Set in AuburnMorro Rock MoonsetSunset at Pfeiffer RockHappy Thanksgiving!
Moon and Sun, a set on Flickr.

I've been teaching people for years how to pursue lunar photography.  I wrote a blog post back in 2006 on anticipating shots like these: 

     Plan Ahead for Great Full Moon Rise and Set Shots!


That planning got even easier with the creation of apps like +The Photographer's Ephemeris (TPE), as I describe in this 2011 update blog post:
     Put Sunset Full Moon Rise Dates on Your Calendar

These days in addition to +The Photographer's Ephemeris I also use +PhotoPills, StarWalk and Sky Safari+ to plan my shots:
Here's our recorded broadcast of the +Landscape Photography Show, when the developers of the PhotoPills app were kind enough to join me to provide a tutorial demonstration for their software:

http://youtu.be/Wgb_r9JlKRM?list=PLlLN6Bdq3jrnAwmOOhU0TufC9XsjbEiK2


If you find this sort of information valuable, given the new tendency of sites like Google+ and Facebook to filter out the posts of people you haven't specifically interacted with lately, you may want to subscribe to updates to this blog through NetworkedBlogs in the right column.  Since social media networks are getting much less reliable at distributing my shooting opportunity notices, tutorials, workshop announcements, or simply my latest work, people who want to stay in touch may need to connect with me across multiple networks to increase the odds of seeing a post: Facebook, Twitter, Flickr, Tumblr, my blogs, or wherever you're active online.  It's frustrating and a little sad that social networks seem to be stepping back from the opportunity to provide reliable delivery of high quality content to people who want to see it!  

Here are some of the places you can connect with me online: