 |
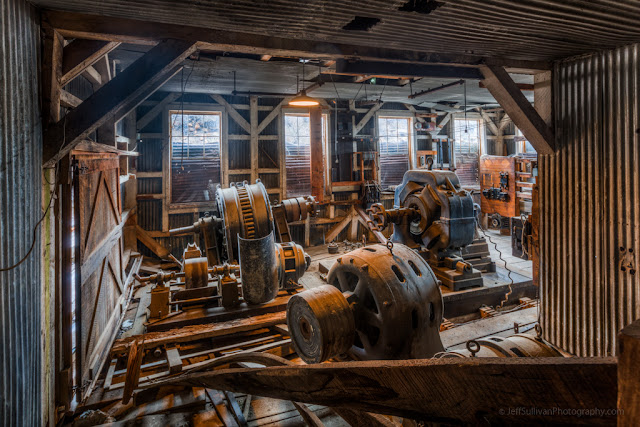
| Inside the Standard Mill at Bodie, single exposure |
Upon arriving at this part of the Standard Mill it was clear that the range of the light of the scene would exceed the dynamic range of the sensor. The highlights would be blown out to white, and shadows would be excessively dark... not at all like what we perceive onsite. So I set my camera to capture 5 exposures.
To recapture the highlight and shadow detail, I decided to try HDR processing. I pre-processed for color adjustment and noise reduction in Lightroom, transferred the 5 files in TIFF format to Photomatix (using its direct interface from the Lightroom File menu), and tried to pick the most realistic HDR mode and make adjustments.
When done in Photomatix the save operation transferred the result in TIFF format back to Lightroom. I post-processed the HDR result in Lightroom again to get the best possible result. It was hard to balance the blue light coming in through the windows and the warm tones from the overhead incandescent lights.
Not satisfied with the colors in the color HDR result, I then tried a similar workflow but instead tried a black and white conversion in that middle Photomatix step.
The black and white result from Photomatix was saved in TIFF format back to Adobe Lightroom 5. Shadow detail is great, but even having captured 5 exposures in two different exposure ranges (using exposure compensation in addition to exposure bracketing) the highlights didn't recover well, and there's some lens flare from the windows as well. I did a little dodging and burning, but I wasn't feeling that the electrical equipment was appropriately ending up as the subject, what a viewers eyes would be drawn to.
I don't tend to shoot a lot of architectural subjects, but when a natural color result wasn't turning out and the lens flare and the composition didn't favor a black and white treatment, I decided to try creative filter processing presets in Lightroom.

Trial 3: Lightroom -> Photomatix -> Lightroom -> Color Presets -> Aged Photo, originally uploaded by Jeffrey Sullivan.
Given the historical nature of the site, the result from Color Presets -> Aged Photo seems to fit the subject well. I'm normally not a big fan of sepia type effects, they tend to be overused and the tones tend to be a little monotonous, but Aged Photo left enough color and black in the photo that I felt the effect didn't entirely steal the show like many treatments, and the focus on the electrical equipment was restored (compared to a monochrome treatment such as black and white for example).
Having given this a rest for a week or two and looking at it with "fresh eyes", I would be curious to go back and mess with the exposure, contrast and black levels on the three pieces of equipment and see if I can get them to stand out more, in a subtle and not overly flashy or gimmicky way. Our eyes are drawn to areas of brightness and/or high contrast, so it may be possible to pull off using radial cursors on the equipment in Lightroom.
Here's the outcome of adding some spot edits on the three pieces of electrical equipment using the new radial cursor in Lightroom 5:

 The difference is subtle, but I think in each case the electrical equipment serves as more effective subject matter in the overall scene. Which one is "best" is really a subjective decision and there's no right answer, but I do feel that all three edited results produced using bracketed exposures turned out as a more interesting and usable result than the individual exposure, and a little extra post-processing in Adobe Lightroom to focus on making the equipment stand out helped them each even more.
If you haven't tried Photomatix, a 30 day evaluation is available through the software's publisher at www.HDRsoft.com. Several of the many processing modes offered place watermarks on the results, but if you do license the software, the watermarks can be easily removed. You can get a 15% discount by using the coupon code JeffSullivan when you by it from HDRsoft: http://www.hdrsoft.com/order.php
 |
| Trial 1: Lightroom -> Photomatix -> Lightroom, HDR in color |
When done in Photomatix the save operation transferred the result in TIFF format back to Lightroom. I post-processed the HDR result in Lightroom again to get the best possible result. It was hard to balance the blue light coming in through the windows and the warm tones from the overhead incandescent lights.
Not satisfied with the colors in the color HDR result, I then tried a similar workflow but instead tried a black and white conversion in that middle Photomatix step.
 |
| Trial 2: Lightroom -> Photomatix Black &White -> Lightroom, HDR in Black & White |
The black and white result from Photomatix was saved in TIFF format back to Adobe Lightroom 5. Shadow detail is great, but even having captured 5 exposures in two different exposure ranges (using exposure compensation in addition to exposure bracketing) the highlights didn't recover well, and there's some lens flare from the windows as well. I did a little dodging and burning, but I wasn't feeling that the electrical equipment was appropriately ending up as the subject, what a viewers eyes would be drawn to.
I don't tend to shoot a lot of architectural subjects, but when a natural color result wasn't turning out and the lens flare and the composition didn't favor a black and white treatment, I decided to try creative filter processing presets in Lightroom.
Trial 3: Lightroom -> Photomatix -> Lightroom -> Color Presets -> Aged Photo, originally uploaded by Jeffrey Sullivan.
Given the historical nature of the site, the result from Color Presets -> Aged Photo seems to fit the subject well. I'm normally not a big fan of sepia type effects, they tend to be overused and the tones tend to be a little monotonous, but Aged Photo left enough color and black in the photo that I felt the effect didn't entirely steal the show like many treatments, and the focus on the electrical equipment was restored (compared to a monochrome treatment such as black and white for example).
Having given this a rest for a week or two and looking at it with "fresh eyes", I would be curious to go back and mess with the exposure, contrast and black levels on the three pieces of equipment and see if I can get them to stand out more, in a subtle and not overly flashy or gimmicky way. Our eyes are drawn to areas of brightness and/or high contrast, so it may be possible to pull off using radial cursors on the equipment in Lightroom.
Here's the outcome of adding some spot edits on the three pieces of electrical equipment using the new radial cursor in Lightroom 5:


If you haven't tried Photomatix, a 30 day evaluation is available through the software's publisher at www.HDRsoft.com. Several of the many processing modes offered place watermarks on the results, but if you do license the software, the watermarks can be easily removed. You can get a 15% discount by using the coupon code JeffSullivan when you by it from HDRsoft: http://www.hdrsoft.com/order.php
No comments:
Post a Comment