
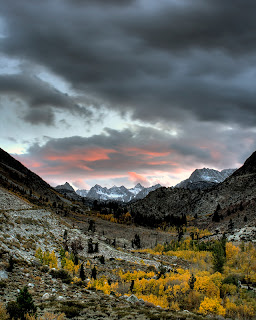
For about a year now I’ve been bracketing exposure on most shots so I have the option of using high dynamic range (HDR) software to increase highlight and shadow detail in my shots.
As noted in this article at NatureScapes.net, digital cameras can capture a range of about 8 stops of light, while film cameras cover about eleven, and your eye covers 14, while an actual outdoor scene may cover 17. HDR software can help you restore some of that range of light and color that your film camera could capture, or that your eye might see.
Many people are now experimenting with or using HDR software, but it can be difficult to produce natural-looking results. By now the majority of my images on this site have some degree of HDR postprocessing involved. In the interest of timely posting, many are first pass edits that I'm not fully satisfied with or done fien tuning yet, but you can decide for yourself whether or not I'm on the right track and my experience might offer some value for you.
Here are some techniques and tricks I've learned to better control my HDR results in an attempt to produce more natural results. I consider this to be a list of basic to intermediate tips. I'm working on a list of more advanced advice on tips and tradeoffs to consider when handling some of your more challenging shooting and postprocessing situations.
Shoot RAW and work only from file formats that preserve maximum tonality data
- Compared to JPEG which has 8 bits of color information, my RAW files have 12 bits, and the extra 4 bits provide 16X more shades of each primary color. In simple terms the HDR software works with 4096 levels of each color instead of 256. The difference can be very noticeable in the results, especially in areas with subtle shading such as blue sky and orange sunsets. Working with JPEG files frankly produced crappy results for many of my shots. Some new cameras just starting to ship now produce RAW files with 14 bit color depth, so the HDR software will have over 8000 levels of each primary color to work with in RAW files instead of 256 in JPEG.
Consider your brightest and darkest shots from any HDR sequence. Using JPEG you're settling for 256 color shades instead of 4096 in 12 bit RAW, dramatically reducing subtle shades by a factor of 16X in exactly those darkest and lightest areas that you're trying to salvage. Assuming 2 stop spacing of shots, perhaps the results where I've noticed a clear difference occurred with colors and brightness values occurring in the 4 ev stops beyond all of the other exposures (the more detailed color data two stops above and two stops below all other shots, no matter what total range you're covering).
- RAW also enables you to change the white balance setting. Want to better preserve the color in your sunset? If your first HDR run on a shot reduces the color too much, try running HDR processing again using the shade or cloudy white balance setting for a warmer (more orange/yellow) tone. You don’t have that option, and can’t achieve the same results, working from JPEG files.
- As noted by the NatureScapes.net article:
Further, the camera applies a tone curve, compressing shadow tones in order to favor highlights. Since I personally find that shadow tones contribute a lot to my HDR work, I would not like to sacrifice them. Finally, introducing JPEG compression artifacts (however slight) into the HDR process may degrade image quality.
I understand there are arguments in favor of shooting JPEG. Typically the benefits raised are to get more continuous frames, more storage capacity, and potentially minimize subsequent workflow effort in RAW conversion. However, in my opinion, these factors are not particularly relevant for HDR work, especially landscape photography as discussed here.
- If you ever intend to "go pro" and submit to stock photography agencies, you'll be happy that you saved the original 16 bit TIFF output from your HDR runs (retaining your full 12 or 14 bit RAW quality, further expanded via HDR into the 16 bit TIFF color space), and don't have to re-run HDR interactively on thousands of archived RAW files to retain value from your shots. (I'm not talking about "microstock" agencies, which are fine with you spending hours to produce and manage high quality JPEG images that can be sold for pennies for online work.)
Use a Tripod and Use Auto Exposure Bracketing
- The less you touch your camera, the more likely your shots will overlay well and produce a sharp image. HDR software such as Photomatix may have the functionality to attempt to get misaligned shots to register well, but don’t count on it; it seems almost as likely to further misalign your shots. Having the camera take the shots as fast as possible also reduces any movement within the scene (leaves, clouds, etc.) that might turn into distracting ghost images in the result... better to prevent the problem and spend any postprocessing time doing something creative rather than trying to repair or salvage a shot with motion artifacts.
Use Interactive Mode, not Batch
- The default settings for Photomatix software for example seem to desaturate and overexpose many images and leave them with unrealistic halos of light around dark objects. HDR processing can reduce noise in some cases, enhance it in others. If you care about the quality of your results, all of these challenges are best faced in interactive mode.
Tame Halos: Set Light Smoothing to High or Very High
- This is your #1 tool to fight distracting light halos that may flag your results as HDR output, what some people might refer to as "overcooked." I set it "very high" at first, then back off a notch or two to see how much HDR the scene can handle.
Tame Noise: Adjust Micro Smoothing
- On some sequences HDR can cancel out noise, for others it might interpret severe noise as valid data and enhance it! Increase the Micro Smoothing setting to smooth out HDR-enhanced noise.
Restore Color: Postprocess in Photoshop or Photoshop Elements
- Since your HDR software shifted light intensities and color tones, something as simple as Auto Contrast and/or Auto Color Correction can make a lot of difference when trying to restore natural-looking lighting and color. Noise reduction can be needed too.
Restore a Natural Look: Layer and Blend HDR Result with a Single Exposure
- Sometimes my best results with HDR software are not acceptable, but neither are my results trying my best to balance the exposure and color in one of my single exposures for the same shot. Consider blending both your best single edit in with your HDR result! The single edit will most likely have better color and shading and the HDR result will have more shadow and highlight detail. A 50/50 or 60/40 blend may still not be a perfect result, but it may be better than either of the two results before you blended them!
 I'd be curious to know what other techniques people have found useful, specifically when their intention is to create realistic-looking results.
If you decide to buy Photomatix, you can get a 15% discount by using the coupon code JeffSullivan when you by it from its publisher HDRsoft: http://www.hdrsoft.com/order.php
(I'm still tuning the focus of this site. If you like my inclusion of experience and technique tips in this blog, drop me a line to let me know in my guestbook. Thanks!)


